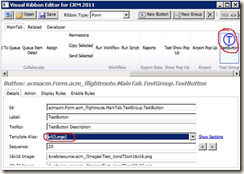
In my previous post, I have explained how to launch a dialog on click of ribbon button located at entity form. Here, in this post I am going to describe how to open a dialog on click of ribbon button located at homepage grid (landing page) of an entity.
In this Example, I’ve used custom entity “Flight Route” contains a button called “Test Button” which will launch a dialog. Dialog will select a flight name from the option set and insert new note record on the selected flight route record.
Following are steps that demonstrate launch dialog from ribbon button.
Before to start with a launch dialog, we need to create
1. Create a dialog for “Flight Route” entity
· Select Solution.
· Select Processes.
· Create new process.

· Specify the Process name.
· Select Entity.
· Select “Activate as” as “Process” and “Category” as “Dialog”.
· Configure it as an on-demand process.
· For this dialog make sure that it should contain at least one “Prompt and Response”

2. Javascript Library as a web resource
· Create new Web resource” /javascripts/LaunchModalDialog.js”

· Click on Text Editor.
· Insert below functions in Text editor window.
In above JavaScript method I have used 3 different parameters.
dialogId is id of the dialog we need to open from button (String Parameter)
typeName is entity’s logical name (CRM Parameter)
recordId is entity’s current record id form where the dialog will be launched(CRM Parameter).
The above function will create server URL according to the CRM configuration. This takes into account IFD and On-premise environments. You can modify or simplify this as needed.
3. Get the Dialog Id Value
· Once you have created new dialog.
· Click Start Dialog.
![clip_image002[4]](https://blogger.googleusercontent.com/img/b/R29vZ2xl/AVvXsEjvpGa2nXQGiF5-Ln_w8LOwF6SL-C2f7_C9EVpnlYrgiFvP1lyji1PZLoJzSdHYmY9shH2ugRSAoDRgHYcTSguHSWKH_kIo48Nebu-0ebE6RpuEA_ANx1OcUl8TLGlXalCnj3c7cw8OnD0/?imgmax=800 "clip_image002[4]")
· That will open new dialog window.
· Get the dialog id value from the URL(Ctrl+N) and note it down somewhere for future use .
4. Insert custom button on entity’s Homepage (landing page) using Visual Ribbon Editor. ( To create a new button on ribbon, you can refer below link---)
http://ankit.inkeysolutions.com/2012/01/crm-2011-how-to-use-visual-ribbon.html
5. After inserting a new custom button, follow the below steps to add javascript function with parameters
· Click on Add link for specifying the “Function name” and “Library”
a. Specify function name and library name.
b. Click on “Add” link as shown below. It will open a list of parameter types which you can pass
with the function.
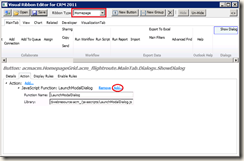
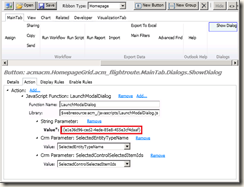
As discussed earlier (refer step 2) we need 3 different parameters to call JavaScript method. Pass those values as described below. The first parameter will be the value which we have noted in step 3. The second one is entity name. And the last one is the record GUID.
· Now you can set Enable Rule for this button.
· Click on “Add” link and select “SelectionCountRule” in “Enable Rules” as shown below.
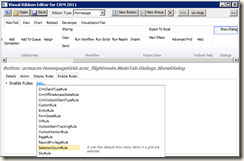
· Specify the require details as shown below.
![clip_image007[4]](https://blogger.googleusercontent.com/img/b/R29vZ2xl/AVvXsEj7xAxzpXxKbuorLiDhoo_KdY7zoPw-KucWJMD-xAbFc5V-NCOTnRn3ombkMNpO9Q13WuVhOsfy9KF4J0osaXp1K703ejimzaQ9z80JZZjCmRWpkyLuB59mellvtUzz0ixOD8J36i1mMSU/?imgmax=800 "clip_image007[4]")
Due to above Rule user cannot select more than one record to launch a dialog. By default this custom ribbon button will be disabled. Once you select a record it gets enabled. Also, while user selects more than 1 record, this button gets disabled.
· Clicks on save. It will save and publish the changes on CRM server.
6. Now you can verify the button on your entity’s Homepage ribbon.
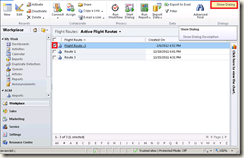
7. On click of this button your dialog will be launched.
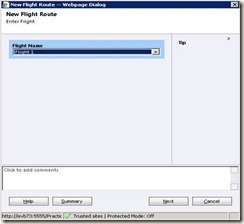
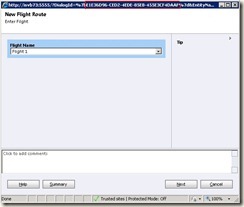
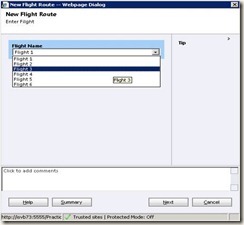
8. Select Flight Name from the list and click next and then Finish on the last screen.
9. At the end, a note will be generated on Flight Route entity

In this Example, I’ve used custom entity “Flight Route” contains a button called “Test Button” which will launch a dialog. Dialog will select a flight name from the option set and insert new note record on the selected flight route record.
Following are steps that demonstrate launch dialog from ribbon button.
Before to start with a launch dialog, we need to create
1. Create a dialog for “Flight Route” entity
· Select Solution.
· Select Processes.
· Create new process.

· Specify the Process name.
· Select Entity.
· Select “Activate as” as “Process” and “Category” as “Dialog”.
· Configure it as an on-demand process.
· For this dialog make sure that it should contain at least one “Prompt and Response”

2. Javascript Library as a web resource
· Create new Web resource” /javascripts/LaunchModalDialog.js”

· Click on Text Editor.
· Insert below functions in Text editor window.
1: function LaunchModalDialog(dialogId,typeName,recordId) 2: { 3: recordId = recordId.toString(); 4: recordId =recordId.replace("{", ""); 5: recordId =recordId.replace("}", ""); 6: 7: dialogId=dialogId.replace("{", ""); 8: dialogId=dialogId.replace("}", ""); 9: 10: var serverUrl = getServerUrl(); 11: // Load modal 12: var serverUri = serverUrl +'/cs/dialog/rundialog.aspx'; 13: 14: var mypath = serverUri +'?DialogId=%7b' +dialogId.toUpperCase() +'%7d&EntityName=' + typeName+'&ObjectId=%7b' +recordId+'%7d'; 15: 16: // First item from selected contacts only 17: window.showModalDialog(mypath); 18: 19: // Reload form. 20: window.location.reload(true); 21: } |
In above JavaScript method I have used 3 different parameters.
dialogId is id of the dialog we need to open from button (String Parameter)
typeName is entity’s logical name (CRM Parameter)
recordId is entity’s current record id form where the dialog will be launched(CRM Parameter).
1: function getServerUrl() 2: {3: // Generate the URL schema using a basic check for SSL 4: var url = 'http' + (WEB_SERVER_PORT == 443 ? 's' : '') + '://'; 5: 6: if (IS_SPLA) 7: {8: // Add the Organisation name in the IFD format 9: url += ORG_UNIQUE_NAME + '.'; 10: } 11: 12: // Append the web server host 13: url += WEB_SERVER_HOST; 14: 15: // Add your custom URL suffix 16: //url += '.mycompanyname.com' 17: 18: if (WEB_SERVER_PORT != 80 && WEB_SERVER_PORT != 443) 19: {20: // Add the port if it is not standard HTTP or HTTPS 21: url += ':' + WEB_SERVER_PORT; 22: } 23: 24: if (IS_ONPREMISE) 25: {26: // Add the on-premise organisation name 27: url += '/' + ORG_UNIQUE_NAME; 28: } 29: 30: // Return the URL 31: return url; 32: } |
The above function will create server URL according to the CRM configuration. This takes into account IFD and On-premise environments. You can modify or simplify this as needed.
3. Get the Dialog Id Value
· Once you have created new dialog.
· Click Start Dialog.
![clip_image002[4]](https://blogger.googleusercontent.com/img/b/R29vZ2xl/AVvXsEgA5-wkxOdaqVQ2W8w49BhIokZwjbgZdFZcCOiopoWeKRq-afHpsEBfIGZp8K4q_sSujrw2afHi654SJsPPekEzwO9mJzstHH6FFTwCzPlR7ffIqi_Q6qcBfMaVIWjm1gfWAmMnogMGRts/s1600-h/clip_image002%25255B4%25255D%25255B2%25255D.jpg "clip_image002[4]")
· That will open new dialog window.
· Get the dialog id value from the URL(Ctrl+N) and note it down somewhere for future use .

4. Insert custom button on entity’s Homepage (landing page) using Visual Ribbon Editor. ( To create a new button on ribbon, you can refer below link---)
http://ankit.inkeysolutions.com/2012/01/crm-2011-how-to-use-visual-ribbon.html
5. After inserting a new custom button, follow the below steps to add javascript function with parameters
· Click on Add link for specifying the “Function name” and “Library”
a. Specify function name and library name.
b. Click on “Add” link as shown below. It will open a list of parameter types which you can pass
with the function.

As discussed earlier (refer step 2) we need 3 different parameters to call JavaScript method. Pass those values as described below. The first parameter will be the value which we have noted in step 3. The second one is entity name. And the last one is the record GUID.

· Now you can set Enable Rule for this button.
· Click on “Add” link and select “SelectionCountRule” in “Enable Rules” as shown below.

· Specify the require details as shown below.
![clip_image007[4]](https://blogger.googleusercontent.com/img/b/R29vZ2xl/AVvXsEhktoEejZypBOebCDHSkYlrbwwfnXnFvlYgdzF4b7BKZHmYOc_KArsdogQJcUOWPcpfEVRdWuCG8Rvi9BI82_f8aV_bneMVDvb9eiIeZie3yGCkFcyAq4D1NRxlFVehgRAvhwGybOaPRGA/s1600-h/clip_image007%25255B4%25255D%25255B2%25255D.png "clip_image007[4]")
Due to above Rule user cannot select more than one record to launch a dialog. By default this custom ribbon button will be disabled. Once you select a record it gets enabled. Also, while user selects more than 1 record, this button gets disabled.
· Clicks on save. It will save and publish the changes on CRM server.
6. Now you can verify the button on your entity’s Homepage ribbon.

7. On click of this button your dialog will be launched.

8. Select Flight Name from the list and click next and then Finish on the last screen.

9. At the end, a note will be generated on Flight Route entity


![clip_image002[4]](https://blogger.googleusercontent.com/img/b/R29vZ2xl/AVvXsEjsDyFKA_45PL5Yy6UPjkN4fXuSuv4FDBg_e7VV09yBQpiHwb4xMh7Y09FsS5GiSYAYf6i2aNSviI4rQYsY74rqady-GFlyEbYqztf0dXl5KjOgi9f1yn69Ix6BKZNzdC7U1vjLlMyGB3o/s1600-h/clip_image002%25255B4%25255D%25255B2%25255D.jpg "clip_image002[4]")


![clip_image002[6]](https://blogger.googleusercontent.com/img/b/R29vZ2xl/AVvXsEg9yvKu3BBIVHmyitQEcGTx197bnN4P1mP8FLMvu0h5d6Eak9NSjkhXgUbEr1M475KIBDdZmsbZCU8_AdcyfhaSFAqWcAzy8VZj8Bxnn8AWk6LjfJLkWUEN6Rjnn3EOVzWwChV2FxAr_1U/s1600-h/clip_image002%25255B6%25255D%25255B2%25255D.jpg "clip_image002[6]")
![clip_image003[4]](https://blogger.googleusercontent.com/img/b/R29vZ2xl/AVvXsEj3TiA7GbhuGg64RRT66BhAR0imV9NzPEb1anGVHpgmLn2jF3Q2cd08U4L8F4r0B-uVTVbhSUpn329kyDbhT7sihaR_LfvEOft_wu-nU_kec526Y-37Q46PCXesDSnTvJl4RjE4RpDwzSs/s1600-h/clip_image003%25255B4%25255D%25255B2%25255D.jpg "clip_image003[4]")